HomeAbout MeArts and CraftsHome DecorDressmakingTutorials

Sunday, August 31, 2014

Shabby Chic Window Seat Cushions

     I thought I'd put these up on the blog.  I made these for my friend Debi's window seat, and aren't they just fabulous?
It was her idea to make them out of painter's tarp.  At first, I cringed because painter's tarp, also known as duck cloth, can be a difficult fabric to work with.
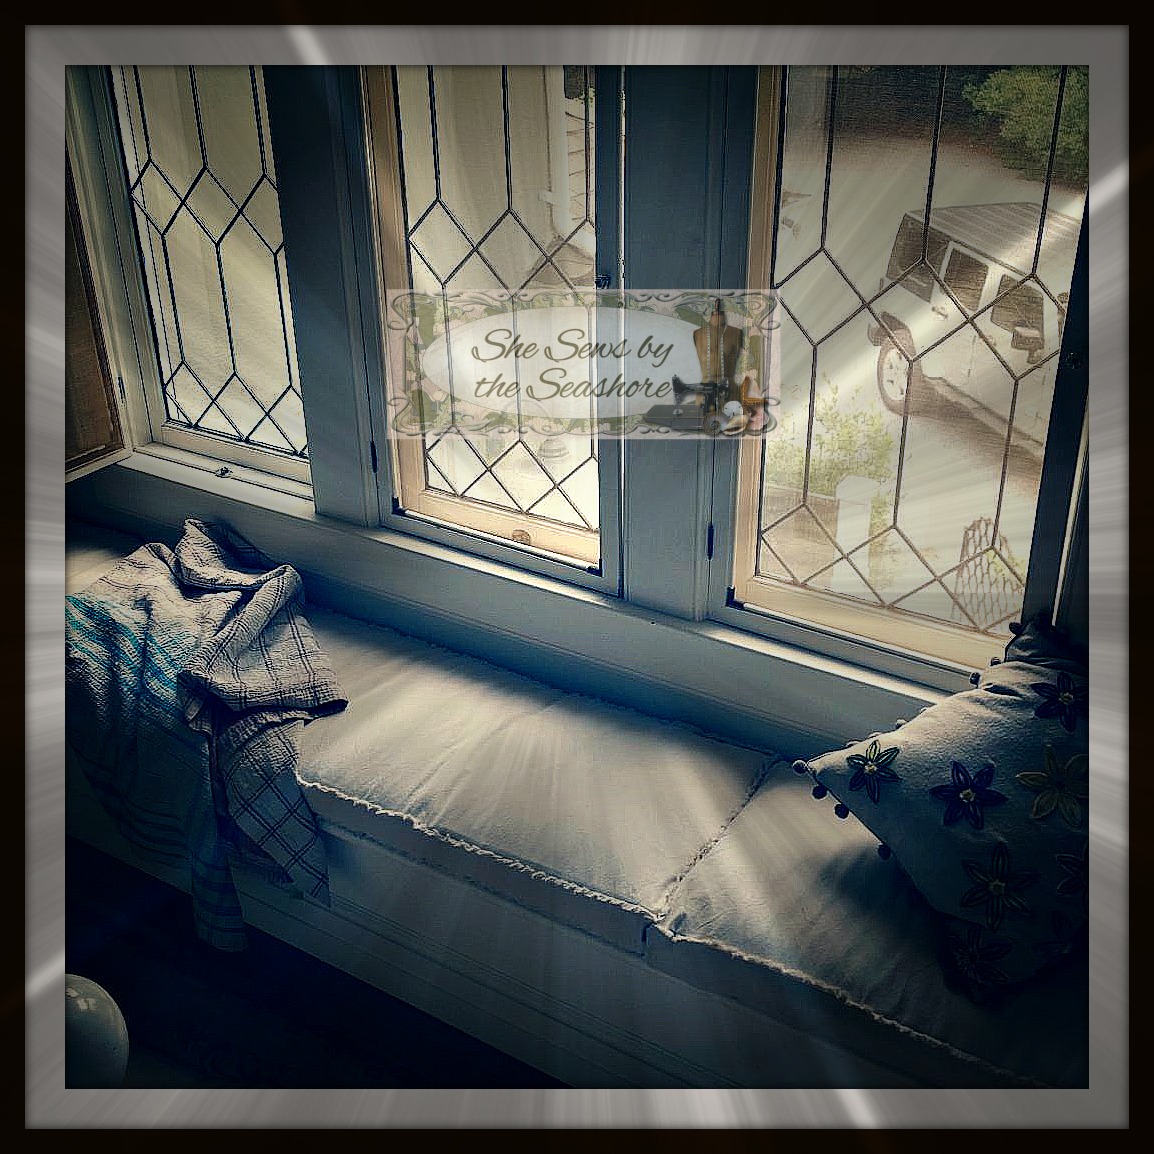
     On the upside, it is very durable, is the ideal neutral color, inexpensive as far as fabric is concerned, and, as you can see below, is the perfect fabric for shabby chic decor.
     On the downside, it has a huge shrinkage factor ( I lost 4 inches per yard after washing), shreds a lot, and even with a high pressure steam iron, is very hard to press crisply flat.
I made three of these cushions for Debi, and by cushion No. 3, I figured out a great way to go about it.
     Normally, when making a cushion, I cut my fabric, stitch, and then serge my seams.  I learned during the making of cushion No. 1,  that if you are going to wash your fabric first, manipulating the fabric during the cutting and sewing phase, will make it shred. A LOT. 
      I chose to wash the fabric first, thinking that if they were ever soiled, they could be cleaned without shrinking the cover.  This left a very soft,  "lived in " look.  Soft and lived in yes, but shreds with cutting and stitching.  So, if you plan on washing the cloth first, press it after drying, and then make your cuts and immediately serge your pieces.  
     You could also just cut the cloth without washing it, which would give you a less wrinkled look, and it would shred less.  Just remember the shrinkage factor if you ever needed to clean them.  Maybe you could try a fabric protector.
     To make the trim, I cut 2" pieces of cloth on the bias, and then pressed in half the long way.  I stitched the trim to the edge of the top and bottom plates before attaching the boxing piece.  Once I stitched the pieces together (with a 1" SA), and turned the cushion cover right side out, I inserted the down cushion.  Then I made small 1 inch cuts along the edge of the flat "welt".  
I then learned, by trial and error, to use a brush attached to the end of a vacuum hose and brush back and forth until you achieved the desired look.  The fabric shreds easily, and then can be trimmed with sharp scissors to look even. 
     Debi loved them, and I think they are excellent for her beautiful space. Such a cozy place to snuggle up with a a book, or for a small spoiled pooch to settle down for a nap....What do you think?

Monday, July 21, 2014

Custom Christening Gown~ A Sweet Dress for a very Sweet Baby

     Among my favorite design projects are creating  Christening gowns for babies.  I have done a half dozen over the past year, and each one brought a great amount of satisfaction.  Like birthdays, communions, and weddings,  Baptisms bring great joy to families.  Parents plan the day, the ceremony, the outfit, the celebration.  So much goes into the process, and in the end, there are many wonderful memories to hold on to the moments.
     A mother and daughter, Laura (Mom) and LouAnn (Grandma), came to consult with me on making a Christening gown for Laura's infant daughter.  The baby's gown was going to be made out of LouAnn's wedding dress, which was almost 38 years old.  The dress had been preserved and boxed, and had been stored away in her attic.  Upon opening the box, this vintage dress was in amazing condition.  The fabric had aged only a tiny bit, and with the exceptions of the cloth buttons, not much had yellowed.  The dress was beautiful, it had been custom made for LouAnn's wedding day .  There was lots of lace and beading, a button down back, and a veil that was to die for with lace flowers, beading, and crystals.
      I love vintage fabrics and embellishments!


Bride and dress ~absolutely stunning..


     Laura was very laid back regarding the design of the dress.  She didn't want anything over the top, nothing too long. Just something simple, and elegant.  She gave me carte blanche over the design, and I was truly excited to begin.
     Here is my creation... 


Gown, bonnet, and lace handkerchief


Gown front and bonnet detail


Bonnet detail~ this lace was just gorgeous!
 
Tiny buttons down her back...beaded flowers too!


Back close up detail...


You can't have a gown without slippers!


LouAnn married Warren August 14, 1976 and now her granddaughter is Baptised almost 38 years later in her remade vintage gown... how sweet is this?
 Laura and LouAnn~ Thank you for trusting me to create her gown. I loved designing it for you.  You are such lovely women, and  I have been blessed to have worked with you both.  The baby is so precious, thank you for bringing her to meet me.  I hope you and your family have a beautiful day!

P.S. LouAnn~ I didn't have the heart to cut that veil.  Who knows, maybe she'll wear it one day....

Sunday, May 25, 2014

A Quilt For Frankie
Bai Jia Bei ~ Luck, Energy and 100 Good Wishes to Surround You

     Many adoptive parents are aware of this tradition, but for those that are unfamiliar, there is a centuries old tradition in northern China, to create a "Bai-Jia-Bei",  or a "100 Good Wishes Quilt" to welcome a new life into a family.  Parents who adopt children from China often choose to honor this tradition.
      One hundred family and friends are invited to donate a piece of fabric along with a written wish for the baby-to-be, or in this case, the adorable five year old boy. A quilt for the child is then crafted from the pieces of material and the written wishes are placed in a memory book  for the child to cherish.  The quilt is an heirloom which can be handed down from generation to generation.
     I feel honored to have been able to make this quilt for Frankie.
     A friend from work , and her husband started the international adoption process in 2006, and were placed "on the list" to adopt an infant girl from China.  They started receiving good wishes and fabric, many of which were of feminine colors and patterns, since all of their family and friends were expecting a baby girl. 


     Prior to the adoption, however, a new list of children became available for adoption.  One of the boys on the list captured their hearts, and they made inquiries to the agency.  In 2008, they were blessed with the adoption of their son, Frankie.  He was a beautiful, energetic, five year old boy.  The rest is history.  He is the sun and moon to his parents and brings countless moments of laughter and smiles to their lives.
    Life is busy, and for sometime, the fabric was stored away.  I was looking for a new project, and I offered to make this quilt for Frankie. ( Actually, I always wanted to make it for him.) Michele gave me the fabric, and my wheels started to turn.
     Because of Frankie's current age (10) , I decided to make the quilt somewhat more of a modern quilt.  I wanted him to think it was cool and fun. I had a few challenges, though, because many of the squares were very feminine.  Like many boys his age, Frankie enjoys sports, cartoons, and video games.  So I had to do a little planning.  I chose to use the darker colored fabric, along with the neutral colors as the main larger squares of the quilt, and I cut up the more feminine pieces into smaller pieces to uses as accents and the binding.  I then spaced the quilted blocks with black border strips to give it a more masculine appeal.


  I chose an Asian -inspired print for the backing of the quilt.  There were also three squares that were much larger than the others.  One of them was a beautiful lady bug cross stitch that was made by one of his aunts. I decided to piece these three squares into the center of the backing of the quilt.  These squares, which contained many pink tones were complimented by the Asian fabric, which was mostly masculine with some pink accents.
 
      Frankie, I hope you enjoy this quilt for many, many years.  You are a sweet, brave boy, who freely offers your beautiful smile to others. I did not have a square of fabric for you, but please know my heart was in each and every stitch. Oh, and I really hope you think it's cool.


    Thank you for visiting my blog.  If you like what you see, please share my blog with friends, or follow me.
    If anyone is interested in having a handmade quilt crafted for someone they love, please contact me through my blog for more information.
 

Sunday, April 27, 2014

Welcome!


Hello and welcome to my new blog! I hope you will return once I begin filling it with things that will hopefully delight and inspire you! See you soon!